
Hey Thrift & Stitch,
I used to just cut pants shorter and try to re-hem them… and they always looked homemade and sad. Then I discovered this method that lets you keep the original hem. Game changer. I’ve done it on jeans, chinos, and dress pants — all turned out looking like they were bought that length.
But here’s the thing: when I searched online for “keep original hem tutorial,” almost every result was the same old confusing method that leaves a bulky fold on the inside. Worse, none of those articles were indexed properly by Google for beginners. So I decided to write this complete, search-friendly guide that actually works. Whether you’re a thrift flipper or just someone who wants pants that fit perfectly, this method will save you time, money, and frustration.
Why Keeping the Original Hem Matters More Than You Think
Most store-bought pants have a hem that’s been through a specialized industrial process. The thread tension, the fading along the edge, and the slight wave of the original stitching are nearly impossible to replicate on a home sewing machine. When you cut off the original hem and try to sew a new one, you lose that factory-made look. That’s why your DIY hems always looked “homemade and sad.” By keeping the original hem, you preserve the manufacturer’s exact finish, including any distressed details, contrast stitching, or decorative topstitching. This is especially critical for vintage jeans or thrifted trousers, where the original hem carries decades of character.
Tools You’ll Need (And Why Each One Matters)
Seam ripper – For removing old hem stitching if you make a mistake.
Sharp scissors – Dull scissors crush fabric; sharp ones give clean cuts.
Pins or clips – Wonder clips work best for thick denim; pins are fine for chinos.
Measuring tape – Flexible, not the metal construction type.
Chalk or fabric marker – Must be removable. Test on a scrap first.
Sewing machine (zigzag or straight stitch) – A basic home machine works. No serger needed.
Iron – Non-negotiable. Pressing is what makes the fold disappear.
Step-by-Step: The Original Hem Shortening Method
Step 1: Try On and Mark the New Length
Put the pants on with the shoes you’ll wear them with. Yes, the actual shoes. Sneakers vs. loafers vs. boots change where the hem should land. Decide where you want the new hem to sit. I usually mark about 1 inch below where I want the final hem to land because we’re folding it up. Use chalk or a pin to mark one leg. Then walk around for two minutes. Sit down. Stand up. Still happy with that spot? Good. Mark the same spot on the other leg.
Step 2: Measure and Mark the Fold Line
Take the pants off and lay them flat on an ironing board or table. Measure from the original hem up to your new mark. Double that distance (because you’re folding the fabric up and then back down). For example: if you want to shorten the pants by 1.5 inches, measure 3 inches up from the original hem and draw a line. Mark this fold line all the way around both legs. Use a ruler and chalk for straight lines. Crooked lines = crooked hems.
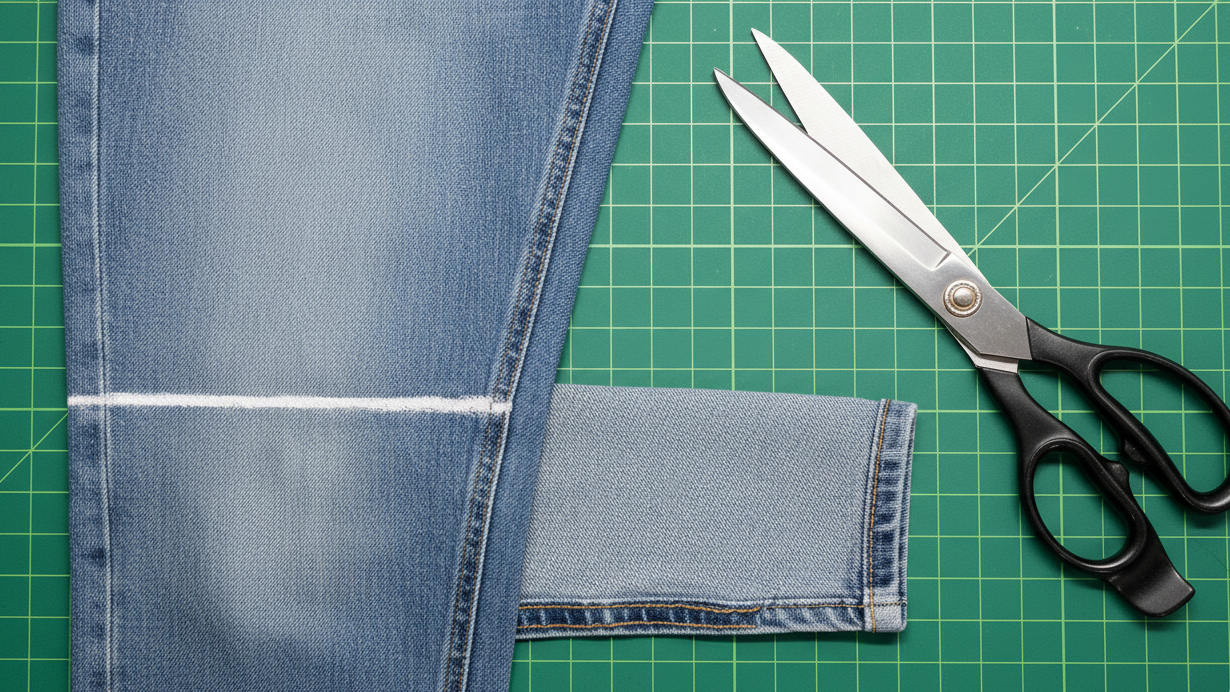
Step 3: Cut Off the Excess Fabric
Here’s the scary part. Cut along the fold line you just marked, leaving the original hem attached at the bottom. You’ll now have a “tube” of extra fabric still connected to the original hem. This feels weird the first time — like you’re cutting your pants in half. But trust the process. The extra fabric is going to fold inside and disappear. Do not cut the original hem off. Do not cut past your chalk line. Measure twice, cut once.
Step 4: Fold and Attach the Original Hem
Fold the original hem back up so the original hem edge now sits exactly at your desired new length. The original hem becomes the new hem again — just relocated higher up. Pin it in place generously. Every inch or so. Sew close to the original hem stitching line (about 1/8 inch away) using a matching thread.
Zigzag stitch = stretch fabrics (jeans with spandex, chinos with elastane)
Straight stitch = rigid fabrics (100% cotton denim, dress trousers)
Sew slowly. For thick denim, use a jeans needle (size 90/14 or 100/16). Go slow enough that you can feel each stitch. Breaking a needle at this step will make you want to throw the pants across the room.
Step 5: Press and Finish
Give the hem a good press with lots of steam. Press from the inside first, then the outside. The original fold line will disappear completely. It looks like the pants were made that length. For jeans only: I sometimes run light sandpaper over the new fold to scuff it up and make it look more natural. That’s optional. For dress pants, skip the sandpaper — just press and wear.
Critical Warnings (Read Before Cutting)
Always double-check both legs are the same length before cutting. Lay one leg on top of the other. Match the inseams and outseams. If they’re off by even ¼ inch, you’ll see it when walking.
Leave a little extra fabric the first time you try this. You can always trim more, but you can’t add it back. Try leaving ½ inch extra. If it’s still too long, re-mark and cut again.
This method works best on straight or slightly tapered pants. Very wide flares can look odd because the original hem is shaped differently from the new fold line. For flares, you’re better off taking them to a tailor.
For thick denim, go slow on the machine. Use a slow, steady pace. If you hear thumping or the machine hesitates, stop and change to a thicker needle. Breaking needles on denim is common — keep spares.
Final Thoughts: Stop Rolling, Start Sewing
Rolling up the legs works for a beach day or a casual photo. But for pants you wear to work, dinner, or anywhere you want to look put together, the roll doesn’t cut it. It adds bulk, falls down after an hour, and announces to the world, “These pants don’t fit me.” This original-hem method fixes that permanently. It takes about 20 minutes from start to finish once you’ve done it once. And the result? Pants that look like they came off the rack in your exact length. So, if your pants are too long, don’t just rely on the method of rolling up the legs anymore. Try doing it yourself instead. You might be surprised by the result — I know I was.


No notes yet — write the first one.