
Dyeing cotton clothes at home takes one bucket, warm water, and patience (so your color comes out even)
What You Need (tools, materials, time, skill level)
Skill level: Beginner-friendly (if you can stir and rinse, you can do this)
Time: Not precisely stated in the source, but plan for prep + soaking + rinsing + washing/drying. The source does specify 40–60 minutes of soaking for the black-dye method.
Tools & materials (all from the source):
- Fabric liquid or powder dye (commercial dye)
- The source mentions Rit as a popular, widely available brand
- Old vinyl tablecloth or plastic drop cloth (to cover your workspace)
- Stainless sink or plastic bucket, or a washing machine
- Do not use porcelain or fiberglass sinks (the source warns they might absorb dye)
- Salt or white distilled vinegar (which one you use depends on fiber)
- Warm water
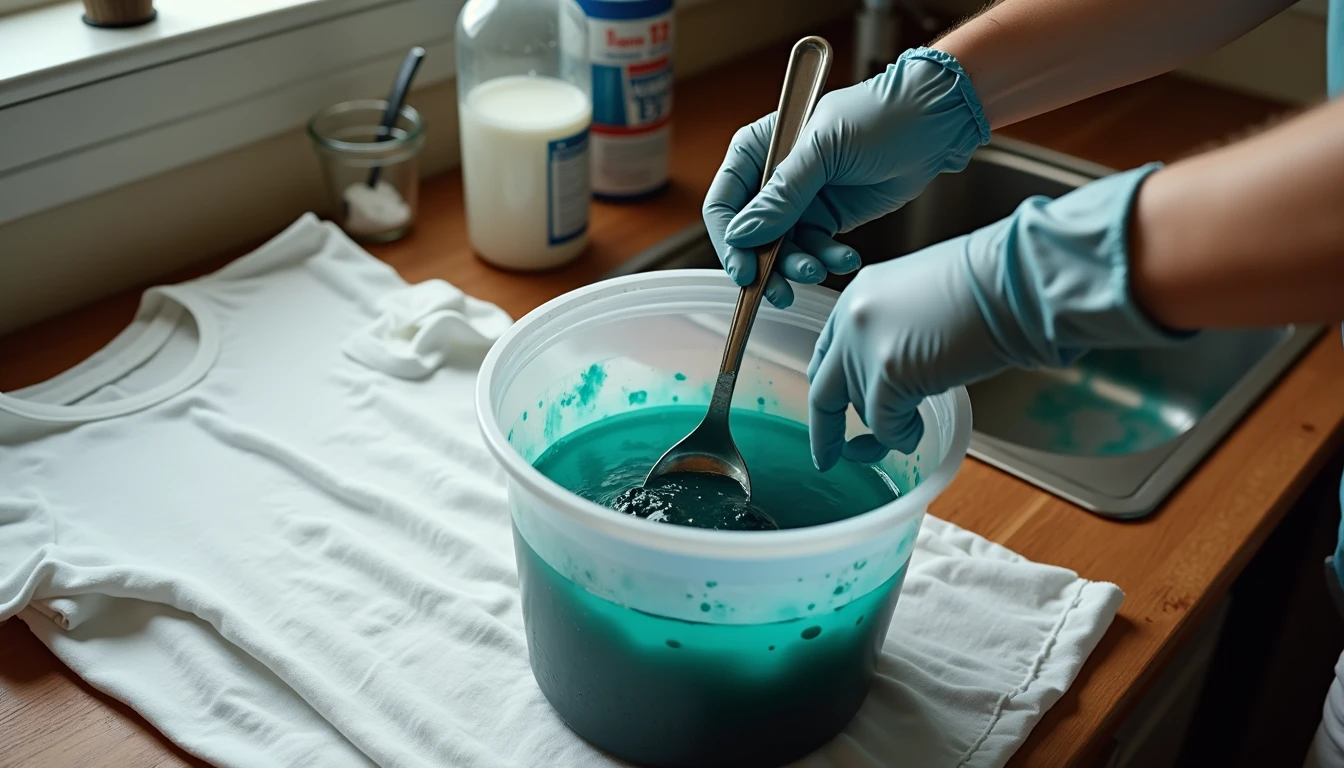
- Rubber gloves
- Metal large spoon (or for the black method: a metal spoon or stick for stirring)
- Old fabric or paper towels
- Chlorine bleach (for cleanup help, not for the garment)
What this works best on (from the source):
- Cotton items like t-shirts, tea towels, curtains, sheets, pillowcases, and “some other cotton items.”
How To Do It (bucket or sink method, step by step)
This is the method I’d tell a friend in my Stitch and Swap Talk chats to start with, because you can *see* what’s happening the whole time.
1) Buy a commercial fabric dye
The source is clear: start with a commercial fabric dye in liquid or powder form. Both work fine.
If you’re standing in a craft or fabric store overwhelmed by the wall of colors, the source calls out Rit as a common, widely available option.
2) Prep your workplace (seriously, do this first)
Cover your area with an old vinyl tablecloth or plastic drop cloth. The source also says you can use an old bed sheet or old rag—anything that prevents accidental splashes from turning your workspace into a permanent “art piece.”
Also: pick the right container.
- Use a stainless sink or a plastic bucket.
- Avoid porcelain or fiberglass sinks because they might absorb the dye (this is one of those warnings you only ignore once).
3) Prep your fabric to dye (clean fabric dyes better)
Start with clean fabric for better results:
- If it’s old fabric, wash it first.
- If it’s new fabric, wash it too.
- The source specifically says: don’t use fabric softeners.
This step is unglamorous, but it’s the difference between “nice even color” and “why is it darker in weird spots?”
4) Put on rubber gloves
Do this before you touch dye. The source calls this out as Step One for a reason: dye hands are real, and they linger.
5) Pre-mix the dye with water + the right additive (salt or vinegar)
Before dumping anything into your main bucket/sink, the source says to mix in a smaller container first:
1. Put 2 cups of water in a bucket or small container.
2. Add your dye.
3. Add:
- 1 cup of salt if you are dyeing cotton, or
- white distilled vinegar if dyeing silk, nylon, or wool
4. Mix well using your metal spoon.
That salt/vinegar choice matters. If you’re dyeing cotton (the most common thrifting find), salt is your buddy.
6) Add warm water to your bucket or sink
The source instructs using warm water. (Warm water helps dye move and penetrate more evenly.)
7) Add your mixed dye to the bucket
Pour the pre-mixed dye solution into your larger bucket/sink of warm water.
8) Test your dye color
The source includes a “test your dye color” step. Take advantage of it before your whole garment commits.
9) Wet down your fabric, then add it to the dye
The source specifically says: wet down your fabric and then add it to the dye bath.
This helps the dye absorb more evenly (dry fabric can grab dye in blotches).
10) Let it soak, then remove it
Let your fabric soak (the source includes a soaking step but only gives a specific time in the black-dye section). When it’s done soaking, remove it from the dye bath.
11) Rinse out the dye, then wash and dry
The source’s order here is important:
1. Rinse out the dye
2. Wash & dry your fabric
12) Clean up your sink or bucket
The source includes cleanup as a real step (because it is). Use your old fabric or paper towels and keep chlorine bleach on hand for cleanup help.
Where It Goes Wrong (and how to recover)
1) You dye in the wrong sink
- Sign: Staining on the sink that doesn’t rinse away.
- Fix: The source warns you up front: avoid porcelain or fiberglass. Use stainless or a plastic bucket instead.
2) Patchy, uneven color
- Sign: Dark splotches, lighter areas, or “tide marks.”
- Why it happens (from the source steps): Skipping the “wash first” or “wet down fabric” steps.
- Recovery move: Re-wet the fabric and re-dye (and next time: start with clean fabric and no fabric softener).
3) You used the wrong additive
- Sign: Color doesn’t take the way you expected.
- Fix: For cotton, use salt; for silk, nylon, or wool, use white distilled vinegar (per the source). If you’re not sure what fiber you have, don’t guess with your favorite piece.
4) Your hands turn the color of your project
- Sign: You already know.
- Fix: Rubber gloves from the start. If you forgot, now you know why the source made it Step One.
Pro Tips (beginner shortcuts that actually help)
- Liquid or powder dye both work fine. Pick what’s available where you live and what you feel confident measuring.
- Cover your workspace bigger than you think you need. Dye splashes are sneaky.
- Keep old fabric or paper towels nearby before you start pouring. Once your gloves are on, you don’t want to touch cabinets and drawers.
- If you’re dyeing cotton items like t-shirts or sheets, lean into salt. The source specifically calls out salt for cotton.
Bottom Line (is it worth DIY-ing?)
If you’ve got cotton thrift finds (t-shirts, tea towels, curtains, sheets, pillowcases) that need a refresh, the source’s bucket/sink method is an accessible, beginner-friendly way to get a big visual payoff at home using warm water, gloves, salt, and commercial dye (like Rit).
I’d skip DIY dyeing if your only available setup is a porcelain or fiberglass sink you can’t risk staining—use a plastic bucket instead, or wait until you can. The best upcycles are the ones that don’t create a second problem you have to live with.